How to use the shared, read-only storage space

Learn how to read data from a shared storage space.

Version 5 Release 2 added the ability for multiple Linux partitions to share virtual disks. Multiple partitions can now read data from a shared storage space concurrently. The ability to share virtual disks is useful whenever two or more Linux partitions need to use the same file. For example:

To use the storage space, you must link to the virtual disk and provide users access. Use either of the following methods to use shared, read-only storage:

Use the iSeries Navigator

To link a disk drive using iSeries™ Navigator, follow these steps:
  1. Click NetworkWindows AdministrationDisk Drives.
  2. Right-click an available disk drive and select Add Link.
  3. Select the server that you want to link the disk to.
  4. Select one of the available link types and the link sequence position.
  5. Select the Shared - Read access type.
  6. Click OK.

Use the Add Network Server Storage Link command

To link a disk drive using the Add Network Server Storage Link command, follow these instructions:
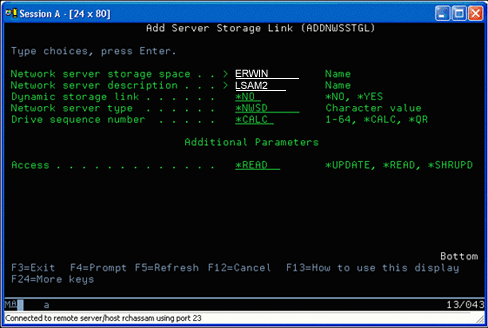
  1. Type the Add Network Server Storage Link (ADDNWSSTGL) command. The storage link for virtual disks that Linux partitions are going to share concurrently must have an access type of read (*READ).
    Add Network Server Storage Link display

    On the Add Network Server Storage Link (ADDNWSSTGL) display, the value you enter in the Dynamic storage link field can be either *YES or *NO. To display the Access option, press the F9 key. If multiple Linux partitions share disks, the partitions must access (that is, mount) the disks from Linux with read-only access.

  2. You can specify that Linux has read-only access to the disk two ways:
    • By using an option on the mount command
    • By specifying read-only as a parameter in the /etc/fstab file
The following is an example of the using the mount command to mount a file system as read-only:
mount -o ro /dev/hdb1 /mnt/data2

An entry in the /etc/fstab file to mount a disk resource as read-only would resemble the following:

/dev/hdb1	/mnt/data	ext2	ro 	1 1

Update and provide users access

To update a shared storage space and provide users access, follow these steps:
  1. Give all users *SHRUPD access to the storage space.
  2. Have all users open the storage space concurrently for read-only access.
  3. Have all users stop accessing the data on that storage space and close (unmount) that device from within Linux.
  4. Have one user open the device for read-write access, update the data, and close the device.
  5. Have all users reopen the device for read-only concurrent access.
Other restrictions:
  • Version 5 Release 2 or later of i5/OS® is required, but it does not have to be in the primary partition.
  • The maximum size supported for a storage space is 1000 GB.
  • The maximum number of storage spaces supported is 64. However, while 64 storage spaces may be linked to the server, only the first 20 storage spaces are visible to Linux, depending on the Linux distribution.