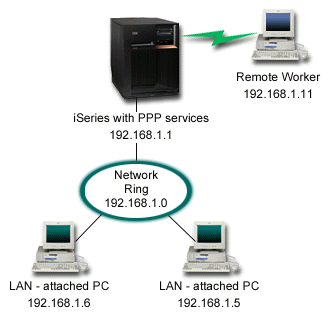
Remote users, such as telecommuters or mobile clients, often require access to a company's network. These dial-in clients can gain access to an iSeries™ server with PPP.
Situation
As an administrator of your company's network, you must maintain both your iSeries server and network clients. Instead of coming into work to troubleshoot and fix problems, you need the capability to work from a remote location, such as your home. Because your company does not have an Internet-bound network connection, you can dial into your iSeries server using a PPP connection. Additionally, the only modem you currently have is your 7852-400 electronic customer support (ECS) modem and you need to use this modem for your connection.

Solution
You can use PPP to connect your home PC to your iSeries server using your modem. Because you are using your ECS modem for this type of PPP connection, you must ensure that your modem is configured for both synchronous and asynchronous modes. This illustration depicts an iSeries server with PPP services that is connected to a LAN with two PCs. The remote worker then dials into the iSeries server, authenticates itself, and then becomes part of the work network (192.168.1.0). In this case, it is easiest to assign a static IP address to the dial-in client.
The remote worker uses CHAP-MD5 to authenticate with the iSeries server. The iSeries cannot use MS_CHAP, so you must make sure your PPP client is set to use CHAP-MD5.
If you want your remote workers to have access to the company network as implied above, IP forwarding needs to be set on in the TCP/IP stack as well as your PPP receiver profile, and IP routing must be configured correctly. If you want to limit or secure what actions your remote client can take in your network, you can use filtering rules to handle their IP packets.
The above illustration only has one remote dial-in client, because the ECS modem can only handle one connection at a time. If your needs require multiple simultaneous dial-in clients, then see the planning section for both hardware and software considerations.
Sample configuration
- Configure Dial-up Networking and create a dial-up connection on the remote PC.
- Configure a Receiver Connection Profile on your iSeries server.
Ensure that you enter the following information:
- Protocol type: PPP
- Connection type: Switched-line
- Operating mode: Answer
- Link configuration: This may be single line, or a line pool, depending on your environment.
- On the General page of the New Point-to-Point Profile Properties, enter a name and description for the receiver profile.
- Click Connection to open the Connection page. Choose
the appropriate Line name, or create a new one by typing
a new name, and clicking New.
- On the General page, highlight an existing hardware resource where your 7852–400 adapter is attached and set the Framing to Asynchronous.
- Click Modem to open the Modem page. From the Name select list, choose the IBM 7852–400 modem.
- Click OK to return to New Point-to-Point Profile Properties page.
- Click Authentication to open the Authentication
page.
- Select Require this iSeries server to verify the identity of the remote system.
- Select Authenticate locally using a validation list and add a new remote user to the validation list.
- Select Allow encrypted password (CHAP-MD5).
- Click TCP/IP Settings to open the TCP/IP page.
- Select the local IP address of 192.168.1.1.
- For the remote IP address, select Fixed IP address with a starting IP address of 192.168.1.11.
- Select Allow remote system to access other networks.
- Click OK to complete the profile.