Compare and update fixes

Use iSeries™ Navigator to compare fixes across your systems or networks of systems. You then have the choice to update your systems with the missing fixes. Find out how the Compare and Update wizard works.

iSeries provides tools and wizards to help you effectively manage your fixes. You will find the Compare and Update wizard to be very helpful. The wizard compares the fix levels of a single system or multiple systems to a model system. You can send the save files of the missing fixes from a source system and then install the fixes to ensure the systems have the same level of fixes. You can also choose which missing fixes you want to send. You can launch the Compare and Update wizard from an endpoint system, a system group, or from a system in your list of connections.

Note: Even though the Compare and Update wizard does not prevent you from comparing and updating fixes on systems at different cumulative levels, it is recommended that your systems be at the same cumulative level. Use the GO PTF menu to ensure that your systems are at the same level, and then use the Compare and Update wizard to work with a smaller number of differences. By following this recommendation, you ensure that the special instructions that accompany the cumulative PTF packages are followed.

To compare and update the levels of your fixes inventory, you need to define a model system and a source system. Your source system will have the fix save files on it. You will use your model system to compare against other systems in your network to ensure that your other systems have the same level of fixes like the model system. The Compare and Update wizard finds missing fixes and extra fixes on the target systems. The following figure shows you a sample network.

Also, you can perform only a compare of fixes with the Compare and Update wizard. You can choose to review your list of missing and extra fixes without requesting to perform an update for the missing fixes.
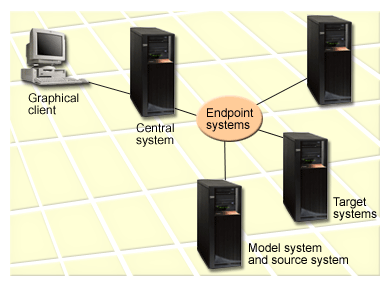

Distribute fixes in a Management Central network
  1. Set up your model system

    Set up a model system that has the appropriate fixes installed for the particular products, all fixes for all products, or fixes for particular releases. In some instances, your model system might be your central system. You should define a model system that works best in your environment. To set up your model system, follow these steps:

    1. Determine which fixes you want installed on the model system.
    2. Install those fixes.
  2. Set up your source system

    Verify that the save files for the fixes exist on the source system for the fixes that are installed on the model system. In some instances, your source system might be your model system. Get the save files to the source system by using the copy from media function.

  3. Refresh your inventory

    The comparison is done based on the information in the inventory, and now that you set up your model system and your source system, you may want to refresh the inventory at this time. If you do not refresh your inventory now, the Compare and Update wizard gives you the opportunity to refresh the inventory.

You can have the wizard perform a comparison, and optionally, send missing fixes, or send and install missing fixes after the compare has completed. As a general reminder, because a collected inventory is used to perform this task, it is important that you have an inventory that is current. You should collect your fixes inventory on all systems before you perform the compare and update task.

To compare and update fixes on your target systems, follow these steps:

  1. In iSeries Navigator, expand Management Central.
  2. Expand Endpoint Systems or System Groups.
  3. Right-click a system or a group and select Fixes, and then Compare and Update.
  4. Use the Compare and Update wizard to determine what fixes are missing from the target system when compared to your model system. When you have finished, Management Central can send or send and install any missing fixes on the target system. When the missing fixes are installed, the target systems then have the same level of installed fixes as the model system.

Compare and update considerations

Scenarios can exist where a fix on the model system is listed as superseded on the target system. In this case, the compare and update function tells you that the fix is missing on the target system because the superseded fix is not installed or the superseding fix is not installed. The fix continues to show as missing until the superseding fix is installed. A fix with a Superseded status does not mean that the later fix was installed. You can still load and apply the fix. A status of Superseded means that a later fix exists on the system. It is possible that the fix was not applied. The following scenarios illustrate this point.

Scenario 1

PTF A on the target system is not installed but shows a status of Superseded. PTF A shows as missing on the target system. The PTF is sent and installed and shows a status of Temporarily applied on the target system.

Model system Target system
PTF A PTF B exists on target system as a save file only. PTF B supersedes PTF A.

Scenario 2

PTF A on the target system is not installed but shows a status of Superseded. PTF A shows as missing on the target system and cannot be installed because PTF B was loaded. PTF B is installed on the target system. PTF A can be installed if it has a status of Superseded only if the superseding PTF, PTF B, was not loaded.

Model system Target system
PTF A PTF B was loaded on the target system. PTF B supersedes PTF A.
Notes:
  1. Only those fixes that are identified as missing can be sent and installed. You cannot uninstall extra fixes. You can only display them.
  2. Fix groups are not used in the compare and update function.
  3. The compare and update function works only with fixes that are installed in some form on the model system for the products that are installed on the model system.