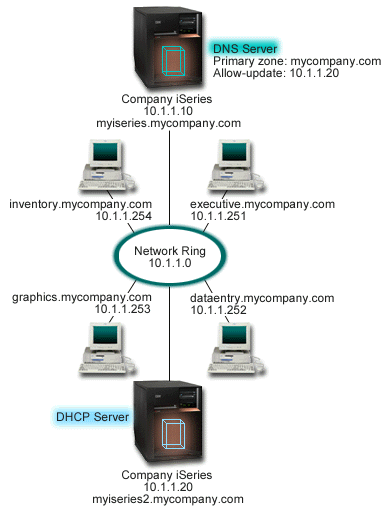
You can learn how to set up DHCP and DNS on two different iSeries™ servers to perform dynamic updates over a simple LAN.
The following illustration depicts a small subnet network with DNS and DHCP running on separate iSeries servers. The iSeries server running DNS will be configured the same as when DNS and DHCP are on the same iSeries. However, there are some additional steps to configure the DHCP server to send dynamic updates.
Figure 1. DNS and DHCP on different iSeries servers


Planning the DHCP setup when using Dynamic DNS
Refer to Example: DNS and DHCP on the same iSeries server for examples of the global configuration options and subnet settings.
Other setup:
- Install i5/OS™ (Option 31). (Domain Name System)
- Install i5/OS (Option 31) on the iSeries server that will be running DHCP, in this case, myiseries2. This option contains the dynamic update API that manages the resource record update process. Refer to DNS system requirements for installation instructions.
- Authorize DHCP to send updates to DNS
- You must authorize the DHCP server to send updates to the DNS server.
You can either repeat the process of defining the Dynamic Update Key, or you
can send the file and place it in the proper directory path. To create a Dynamic Update Key on both iSeries servers, follow these steps:
- In iSeries Navigator, expand .
- In the left pane, right-click DNS and select Manage Dynamic Update Keys...
- On the Managing Dynamic Update Keys page, select Add...
- On the Add Dynamic Update Keys page, complete the
following fields:
- Key name: Specify the name for the key, for example mycompany.key. The key name must be dot-terminated.
- Dynamic update zones: Specify the zone names for which this key will be valid. You can specify more than one zone.
- Generate key: Select the method that you want to use to generate a secret key.
- Repeat the preceding steps so that the same key is defined on both the iSeries running DNS and the iSeries running DHCP.