The DFNCHR keyword allows you to define characters of your own design at the file or record level for the 5224 Printer and 5225 Printer.
With this keyword you can specify DFNCHR more than once at the file or record level, or as many as 50 characters each time you specify DFNCHR.
The format of the keyword is:
DFNCHR(X'code-point-1' X'dot-matrix-pattern-1'
[X'code-point-2' X'dot-matrix-pattern-2'...
[X'code-point-50' X'dot-matrix-pattern-50']])
User-defined characters can take up one print position (as in example 1) or more than one print position (as in examples 2 and 3). For each print position, specify a code point and a dot matrix pattern. In the EBCDIC character set, hexadecimal C1 is assigned the character A; hexadecimal 51 is an unassigned code point.
You define a dot matrix pattern in DDS by specifying nine 2-digit pairs of hexadecimal digits. You can specify only the characters 0 through 9 and A through F.
When your program sends an output operation to a record format for which DFNCHR defines code points different from those defined for the previous output operation, the i5/OS™ operating system loads the new definitions, thereby changing the defined characters. This process can slow printing.
If, however, the same DFNCHR keywords are in effect for two output operations in a row, the i5/OS operating system does not reload code points for the second output operation.
You can use DFNCHR only with SCS printers. It cannot be specified on the same record format with IPDS™ printer keywords, such as COLOR, LPI, and BARCODE. If any format in the file contains a combination of SCS and IPDS printer keywords, the file is not created.
If you specify DFNCHR in a file created with DEVTYPE(*IPDS) or DEVTYPE(*AFPDS), a warning message appears at create time.
You cannot specify DFNCHR on the same record format as the DRAWER keyword. If any format in the file contains DFNCHR at the record-level and a DRAWER keyword, the file is not created.
Option indicators are valid for this keyword.
Examples
The following examples show how to specify DFNCHR.
Example 1:
The following example uses a single dot matrix to show how to specify DFNCHR at the record level so that hexadecimal 7C prints © instead of @.
|...+....1....+....2....+....3....+....4....+....5....+....6....+....7....+....8
12
00010A          R RECORD                    DFNCHR(X'7C' X'007E813CC324817E00')
00020A                                 58  4DFT(X'7C')   TRNSPY
00030A                                    +2DFT('1982')
     A
© 1982
The hexadecimal digits 2 define the following dot matrix pattern:
Example 2:
The following example uses a dot matrix for a large character. This example shows how to specify DFNCHR at the file level for a character two positions wide by two lines high.
|...+....1....+....2....+....3....+....4....+....5....+....6....+....7....+....8
12
00010A                                      DFNCHR(X'51' X'000000FF00FF00E700' +
00020A                                             X'52' X'E700E700E700E10000' +
00030A                                             X'53' X'0000009C001F000700' +
00040A                                             X'54' X'07000700FF00FC0000' +
00050A                                             X'55' X'00000000FF00E700E7' +
00060A                                             X'56' X'00E700E700E3000000' +
00070A                                             X'57' X'000000001E00070007' +
00080A                                             X'58' X'0007000700FE000000')
00090A          R RECORD1
00100A                   3  58  4DFT(X'5152')   TRNSPY
00110A                                 58  4DFT(X'5556')   TRNSPY
00120A                                 59  4DFT(X'5354')   TRNSPY
00130A                                 59  4DFT(X'5758')   TRNSPY
     A
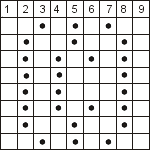
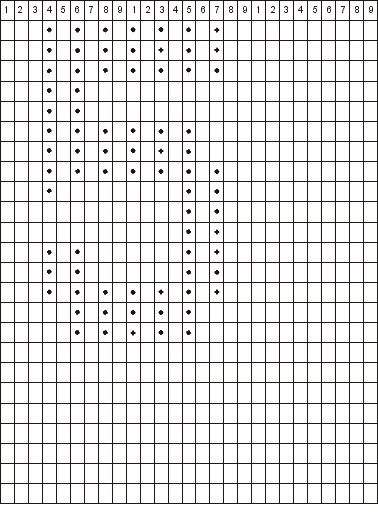
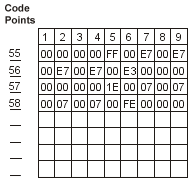
Example 2 redefines eight code points (hexadecimal 51 through hexadecimal 58) 1. Each position of the two-by-two character is printed twice so that adjacent horizontal dots can print. The hexadecimal codes 2 define the dot matrix pattern.
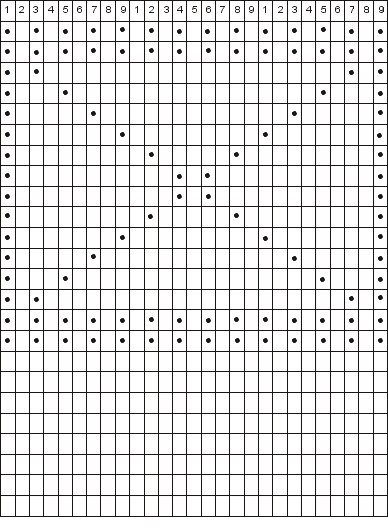
The information marked 3 shows how the large character 5 looks when printed (using four print positions, two on line 58 and two on line 59 of a printer form):
In the grid pattern, mark the dot patterns for as many as nine print columns (three across and three down), as shown in example 2.
Use Table 1 to determine which hexadecimal digit to specify for each half-column in the grid pattern.
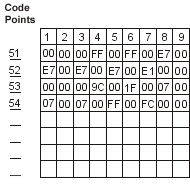
For each print position, complete one row of the grid pattern (one pair of hexadecimal digits to each box) as shown in Figure 3 for code points 51 through 54.
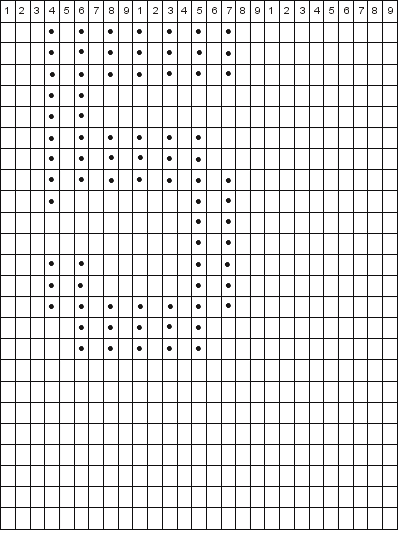
In the grid pattern, mark the dot patterns for as many as nine print columns (three across and three down), as shown in Figure 4.
Use Table 1 to determine which hexadecimal digit to specify for each half-column in the grid pattern.
For each print position, complete one row of the grid pattern (one pair of hexadecimal digits to each box) as shown in Figure 5 for code points 55 through 58.
Example 3:
The following example uses a dot matrix for a large graphic to show how to specify DFNCHR at the file level for a large graphic three columns wide by two lines high.
|...+....1....+....2....+....3....+....4....+....5....+....6....+....7....+....8
00010A                                         12
00020A                                      DFNCHR(X'B1' X'FF00E000D000C800C4' +
00030A                                             X'B2' X'00C200C100C100C200' +
00040A                                             X'B3' X'C400C800D000E000FF' +
00050A                                             X'B4' X'FF0007000800130023' +
00060A                                             X'B5' X'004300830083004300' +
00070A                                             X'B6' X'230013000B000700FF' +
00080A                                             X'B7' X'00FF00F000D800CC00' +
00090A                                             X'B8' X'C600C100C100C100C6' +
00100A                                             X'B9' X'00CC00D800F000FF00' +
00110A                                             X'BA' X'00FF000F001B003300' +
00120A                                             X'BB' X'630083008300830063' +
00130A                                             X'BC' X'0033001B000F00FF00')
00140A          R RECORD1                   CPI(15)
00150A                                 58  4DFT(X'B1B2B3')   TRNSPY
00160A                                 58  4DFT(X'B7B8B9')   TRNSPY
00170A                                 59  4DFT(X'B4B5B6')   TRNSPY
00180A                                 59  4DFT(X'BABBBC')   TRNSPY
     A
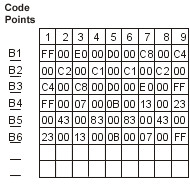
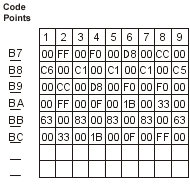
The example redefines 12 code points (hexadecimal B1 through hexadecimal BC) 1. Each column of the three-by-two character prints twice so that adjacent horizontal dots can print. The hexadecimal codes 2 define the dot matrix pattern.
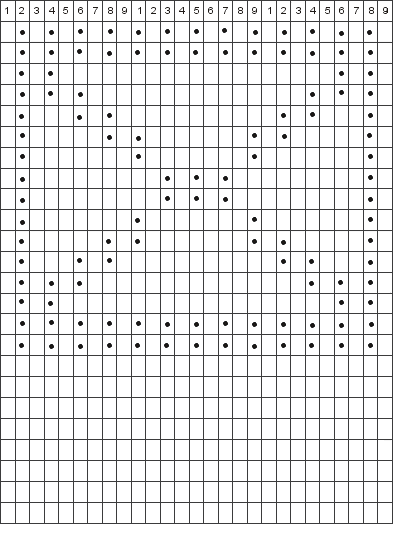
This example prints an X inside a grid using three print columns (on lines 58 and 59 on a printer form).
Mark the dot patterns for as many as nine print columns (three across and three down) in the grid, as shown in the example.
Use Table 1 to determine which hexadecimal digit to specify for each half-column in the grid. For each print position, complete one row of the grid pattern (one pair of hexadecimal digits to each box) as shown in Figure 7.
As shown in Figure 8, mark the dot patterns in the grid for as many as nine print columns (three across and three down).
Use Table 1 to determine which hexadecimal digit to specify for each half-column in the grid. For each print position, complete one row of the grid pattern (one pair of hexadecimal digits to each box) as shown in Figure 9.
