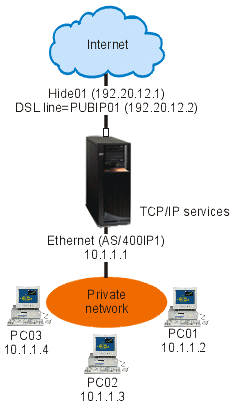
In this scenario, your company uses masquerade network address translation (NAT) to hide the private addresses of your personal computers. At the same time, your company allows your employees to access the Internet.
Situation
You have a small company and you want to allow HTTP service on your iSeries™ server. Your iSeries server has one Ethernet card and three personal computers. Your Internet Service Provider (ISP) provides you with a DSL connection and a DSL modem. The ISP also assigns you the following public IP addresses: 192.20.12.1 and 192.20.12.2. All of your personal computers have 10.1.1.x addresses on the internal network. You want to ensure that the private addresses of your personal computers remain hidden to prevent external users from initiating communications with your internal network, while at the same time, allowing your employees to access the Internet. What should you do?

Solution
Hide your personal computer addresses, 10.1.1.1 through 10.1.1.4, behind the public address, 192.20.12.1. You will then be able to run TCP/IP services from the 10.1.1.1 address. Range NAT (hiding a range of internal addresses) will protect your personal computers from communication that is initiated outside your network because for range NAT to start, traffic must be initiated internally. However, range NAT will not protect the iSeries interface. You will need to filter traffic to protect your iSeries server from receiving untranslated information.
Configuration
To configure the packet rules described in this scenario, use the Address Translation wizard in iSeries Navigator. The wizard requires the following information:
- The set of addresses you want to hide: 10.1.1.1 through 10.1.1.4
- The interface address behind which you want to hide the set: 192.20.12.1
To use the Address Translation wizard, follow these steps:
- In iSeries Navigator, select .
- Right-click Packet Rules, and select Rules Editor.
- From the Welcome Packet Rules Configuration dialog, select Create a new packet rules file, and click OK.
- From the Wizards menu, select Address Translation, and follow the wizard's instructions to configure the hide address translation packet rules.
The packet rules look like the following example:

After you finish creating these filter rules, you should verify them to ensure that they will activate without errors. After that, you can activate them.