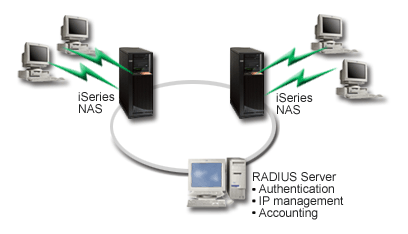
A Network Access Server (NAS) running on the iSeries™ server can route authentication requests from dial-in clients to a separate RADIUS server. If authenticated, RADIUS can also control the IP addresses to the user.
Situation
Your corporate network has remote users dialing into two iSeries servers from a distributed dial-up network. You need a way to centralize authentication, service and accounting, allowing one server to handle requests for validating user IDs and passwords, and determining which IP addresses are assigned to them.

Solution
When users attempt to connect, the NAS running on the iSeries servers forwards the authentication information to a RADIUS server on the network. The RADIUS server, which maintains all authentication information for your network, processes the authentication request and responds. If the user is validated, the RADIUS server can also be configured to assign the peers's IP address, and can activate accounting to track user activity and usage. To support RADIUS, you must define the RADIUS NAS server on the iSeries.
Sample configuration
- In iSeries Navigator, expand Network, right-click Remote Access Services and select Services.
- On the RADIUS tab, select Enable RADIUS Network Access Server connection, and Enable RADIUS for authentication. Depending on your RADIUS solution, you may also choose to have RADIUS handle connection accounting and TCP/IP address configuration.
- Click the RADIUS NAS settings button.
- On the General page, enter a description for this server.
- On the Authentication Server (and optionally Accounting Server) pages,
click Add and enter the following information:
- In the Local IP address box, enter the IP address for the iSeries interface used to connect with the RADIUS server.
- In the Server IP address box, enter the IP address for the RADIUS server.
- In the Password box, enter the password used to identify the iSeries server to the RADIUS server.
- In the Port box, enter the port on the iSeries used to communicate with the RADIUS server. The defaults are port 1812 for the authentication server or 1813 for the accounting server.
- Click OK.
- In iSeries Navigator, expand .
- Select the Connection profile that will use the RADIUS server for authentication. RADIUS services are only applicable for Receiver connection profiles.
- On the Authentication page, select Require this iSeries server to verify the identity of the remote system.
- Select Authenticate remotely using a RADIUS server.
- Select the authentication protocol. (PAP, or CHAP-MD5) This protocol must also be used by the RADIUS server.
- Select Use RADIUS for connection editing and accounting.
- Click OK to save the change to the connection profile.
You must also setup the RADIUS server, including support for the authentication protocol, user data, passwords, and accounting information. Refer to your RADIUS vendor for more information.
When users dial in using this connection profile, the iSeries will forward the authentication information to the specified RADIUS server. If the user is validated, the connection will be allowed, and will use any connection restrictions specified in the user's information about the RADIUS server.