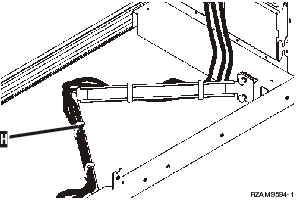
The rack has a cable management arm and fasteners
that help manage excess cabling and secure your cables within the rack. The
steps in this topic describe how to use the cable management arm and fasteners
provided with the rack.
Attention: Because each server in your rack is unique,
each server has its own box of cables and materials. Before you begin the
cabling process, verify that you are using the correct cables and documentation
for the server you are cabling. You can determine which box is for which server
by comparing the serial number on the server to the serial number on the container
label located on the outside of the ship group container or the packing slip
in the box. The serial number is located on the control panel of each server.
Cable one server at a time, being sure to use the correct cabling poster for
the server you are cabling.
- Cable the server using the 270
cabling instructions but do not turn on the server. Return to these
instructions and continue with the next step.
Note: The servers
within the rack are shipped without back covers, so there is no need to remove
the back covers as stated in the cabling instructions.
- After cabling the server, press the latches on the front of the
server tray and use the center handle to slide the server out.
- When the server tray is fully extended, feed the
excess cabling along the cable management arm H and secure the cables
with the fasteners, as shown. Be sure to allow excess cable at the cable management
arm hinge so that you can slide the server tray all the way in without pulling
on the cables.

- Slide the server back into the rack.
Note: Arrange
the power cords to meet any local codes or regulations you might have.
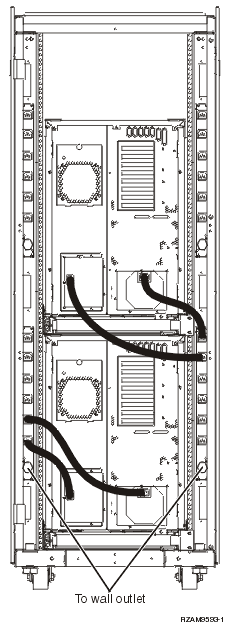
- If you are using a power distribution unit, connect the power cords
to it as shown below.
Note: The power distribution
unit is optional and you will have one to four power distribution units.
Connect
the power cord from the power distribution unit to the wall outlet. If you
are using two power cords, plug each power cord into a separate power source.

- Refer to the cabling instructions section, "Turn
on your server" and continue cabling your server.
- Repeat this whole procedure if you have another server in your
rack.
- When you are done with the cabling and server setup, close the
back door of the rack.
- Put the brackets that secure the trim back on the rack. These brackets
were removed during unpacking.
- Return to the cabling instructions section, "Set up your server",
and complete the server setup.

